Roots and containers · Care note 006
Root-bound, or just having a hard week?
A root at the drainage hole is a clue, not a diagnosis. Check the plant, root ball, medium, pot, light and watering history before turning one symptom into a larger container.
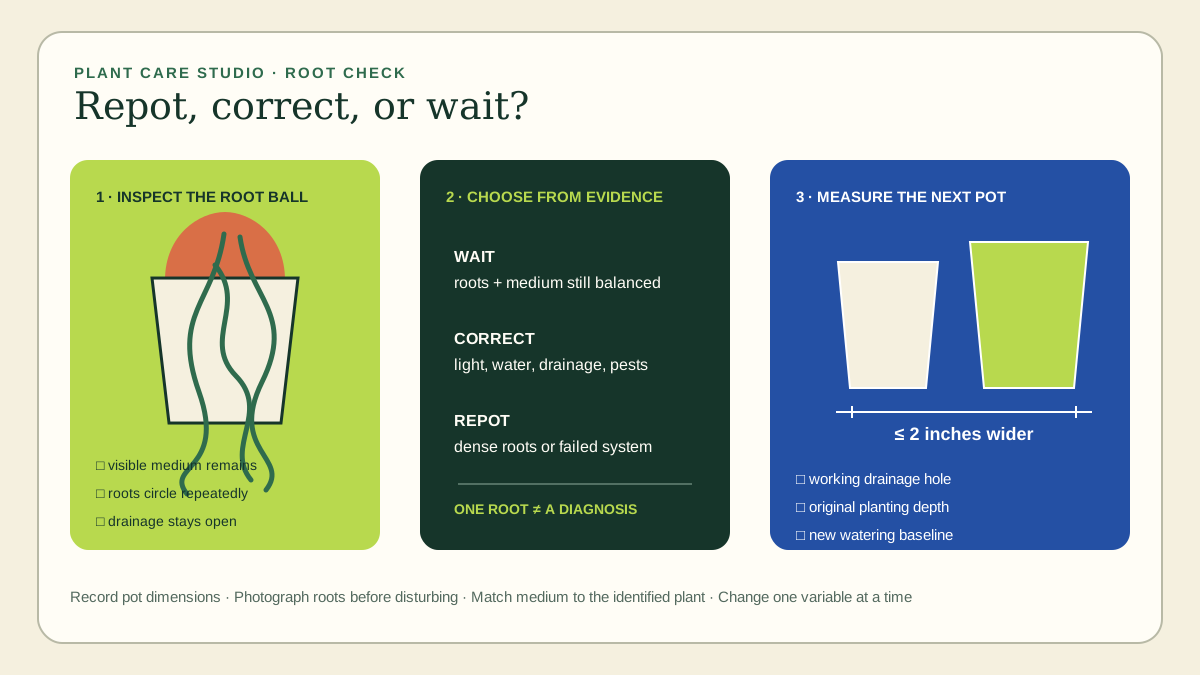
“Root-bound” is often used for any houseplant that droops, stops growing, needs frequent water, or shows a root outside the pot. Those signs overlap with low light, damaged roots, compacted medium, an oversized container, pests, seasonal slowdown, and irrigation problems. Repotting can solve a genuinely crowded or failed root zone. It can also add disturbance, wet unused medium, and a new watering pattern to a plant whose real problem was elsewhere.
A better decision uses several forms of evidence. Record the plant identity, pot dimensions, drainage, last repot date, light, irrigation interval, and recent changes. Then inspect the root ball only when it can be removed without breaking apart or damaging a fragile plant. The goal is to choose among three actions: keep the current pot, refresh or correct the system, or move to a modestly larger container.
Measure the old pot and inspect the roots. Arkansas Cooperative Extension says a replacement pot should be no more than two inches larger in diameter than the old pot and must have a drainage hole. A dramatically larger decorative pot can leave a small root system surrounded by more wet medium than it can use.
Combine signals instead of trusting one
Roots emerging from a drainage hole can mean the plant is filling the pot, but a single exploring root does not prove that the entire root ball is crowded. A plant may send roots toward a moist saucer while much of the medium remains open. Likewise, slow growth may be normal during low-light months or for a naturally slow species.
| Observation | What it may mean | What to check next |
|---|---|---|
| Water runs through very quickly | Dense roots, a shrunken dry root ball, a channel down the pot wall, or coarse failed medium | Inspect moisture at depth and the root-to-medium ratio |
| Plant wilts sooner than its old baseline | More root demand, higher light or heat, damaged roots, or uneven wetting | Compare light, temperature, pot weight and root condition |
| Roots circle the pot wall | The root system has followed the container boundary | Look for how much medium remains and whether the circles form a dense mat |
| Roots lift the plant or deform the pot | Severe crowding or unstable planting depth | Plan a species-appropriate root and container correction |
| Yellowing or leaf drop | Possible root stress, but also light, water, temperature, pests or nutrition | Use a full cultural check before repotting |
Iowa State University Extension's guide to diagnosing houseplant problems emphasizes that cultural symptoms overlap. Brown tips, yellow leaves, wilting and leaf loss do not point to a single cause. Use the site's winter watering check to compare moisture, pot weight, light and seasonal water use. If insects or larvae are present, the fungus gnat control plan separates pest evidence from the wet conditions that may support it.
Slide out the root ball without staging a rescue
Inspect when the medium is moist enough to hold together but not saturated, unless species-specific guidance says otherwise. Support the plant and root ball rather than pulling hard on stems. Tip smaller pots sideways, squeeze a flexible nursery pot, or tap the rim gently. For a large, spiny, brittle or top-heavy plant, get help and use protective equipment appropriate to the species.
Stop if the root ball begins to crumble or the plant resists in a way that could tear major roots. A fixed root mass in a rigid or valuable container may need a different removal plan. Do not use knives blindly along the inside wall where thick roots or storage organs may sit.
Once released, photograph the side and bottom before disturbing anything. Record:
- Root-to-medium ratio: Is potting medium still visible between roots, or has the outer wall become a nearly solid root mat?
- Root direction: Are a few roots exploring, or are many circling repeatedly around the wall and base?
- Root condition: Are roots firm and consistent with the species, or soft, hollow, sloughing, foul-smelling, or otherwise damaged?
- Medium condition: Is it porous and springy, or collapsed, crusted with salts, hydrophobic, waterlogged, or separated from the pot?
- Drainage path: Are holes open, or blocked by roots, mesh, compacted medium, or a reservoir insert?
Root color alone is not a universal health test. Healthy roots may be white, tan, brown, green, thick, fine, fleshy, fibrous, or covered with bark-like tissue depending on the plant. Compare with authoritative guidance for the identified species. A nursery tag that says only “tropical foliage” is not enough for aggressive root work.
When the current pot can stay
Keep the current container when there is visible medium, drainage works, the root ball is stable, and symptoms trace more convincingly to a recent change in light, temperature or watering. Return the plant at the same depth and correct that environmental factor. Do not turn an inspection into mandatory repotting.
Season matters because plant activity changes. A stable plant in low winter light may recover more slowly from disturbance and use water more slowly in fresh medium. If there is no urgent root, drainage or container problem, waiting for an active-growth period can make the aftercare easier to read. That is a planning preference, not a prohibition. A cracked pot, blocked drainage, collapsed medium, unsafe top-heaviness, or clearly damaged root system can make prompt action the lower-risk choice.
Waiting should still produce a record. Note the inspection date, photograph the root ball, and set a review point tied to growth and moisture behavior. Avoid a vague “repot in spring” reminder. Write what evidence would trigger the change: a denser root wall, repeated drainage blockage, sharply shortened watering interval under similar conditions, or plant-specific growth cues.
Measure the next pot from the inside
Arkansas Extension recommends a new pot no more than two inches larger in diameter than the old one. Treat that as an upper limit, not an automatic increment. For a small plant, one inch may be a substantial volume increase. Pot depth, taper and shape can change volume even when top diameter looks similar.
Measure the old pot's inside diameter at the root-ball level and its usable depth. Measure the new pot the same way. Confirm a working drainage hole and enough headspace to water without immediate overflow. If the decorative container has no drainage, use it only as a cachepot around a correctly sized, draining inner pot and remove standing water after irrigation.
| Field | Old pot | Candidate pot |
|---|---|---|
| Inside top diameter | Measure below the rim | Difference no more than 2 inches unless species guidance supports otherwise |
| Usable depth | Root ball and headspace | Enough for roots without burying the stem |
| Drainage | Hole count and condition | Open, functional path to a removable saucer |
| Material | How quickly it dries | Expected change in evaporation and weight |
| Stability | Plant balance | Safe base and shelf load |
Material changes the watering system. Arkansas Extension notes that clay and ceramic dry sooner than plastic, while plastic is lighter and tends to need less frequent watering. A move from porous terracotta to glazed ceramic can change moisture behavior even when dimensions match. Record the material so the old watering interval is not copied blindly.
Read the medium as a set of functions
Choose a medium for the identified plant, container and indoor conditions. Arkansas Extension describes quality potting soil as porous enough for root aeration while retaining water and nutrients. Illinois Extension likewise emphasizes the balance between drainage, aeration and moisture retention in containers. One bag cannot behave identically for an orchid, cactus, fern and tropical aroid.
Read the ingredient panel, wetting instructions, added fertilizer statement, storage directions and intended use. “Indoor mix,” “natural,” and “premium” do not disclose particle size, nutrient charge or water behavior. If the bag includes fertilizer, account for that before adding another product. Do not add garden soil, sand, rocks, charcoal or amendments by recipe unless authoritative species guidance supports the material and proportion.
Do not create a gravel drainage layer. A drainage hole and suitable medium move water out of the root zone; a layer of coarse material at the bottom can leave a perched wet zone above it. Fill the pot with the selected medium at a consistent density rather than packing it hard around roots.
Repot in a clean, reversible sequence
- Prepare first. Clean the work surface, pot and tools. Have the measured container, medium, label and saucer ready before exposing roots.
- Document the root ball. Photograph and record any damaged areas, pests, old mesh, plugs or constricting ties.
- Release only what needs release. Arkansas Extension advises unwinding roots that encircle the plant. Work gently and keep healthy roots intact when possible.
- Use species-specific root guidance. Do not copy a vertical-cut or root-pruning technique across unrelated plants. Severe mats, woody roots, tubers, orchids and succulents require different handling.
- Set the original depth. Arkansas Extension says not to add medium above the original root-ball level unless roots were exposed. Keep stems, crowns and storage organs at the depth appropriate for the species.
- Fill the side gap. Add medium around the root ball without leaving large voids or crushing air space. Keep the watering headspace clear.
- Water according to the plant and medium. Arkansas Extension recommends watering to settle the plant. Verify drainage and empty the saucer; adjust for species that require a different immediate routine.
Do not fertilize automatically to “help with shock.” Use the medium label, plant condition and species guidance. Fresh mixes may already contain fertilizer, and damaged roots may not benefit from an added salt load. Record any product, rate and date so a later symptom can be interpreted.
Replace the old schedule with observations
A repotted plant has a new container volume, medium distribution and drying pattern. The old watering interval is no longer evidence. Set a recurring check day, then inspect at a useful root-zone depth, lift or weigh the pot when practical, and look for drainage before deciding to water.
Keep light appropriate for the species and avoid moving the plant through several environmental changes at once. If it also needs a new grow light, use the measured grow-light setup and stagger changes where possible. A plant repotted, moved, fertilized and placed under new light on one day gives you no clean way to identify the cause of a later response.
| Checkpoint | Record | Watch for |
|---|---|---|
| Day 0 | Pot and root photos, dimensions, medium, water and drainage | Stability, leaks, blocked drainage |
| Days 2–7 | Moisture depth, pot weight, leaf posture, room conditions | Medium staying wet far longer than expected or pulling away dry |
| Week 2 | Water use, pests, damaged leaves, new growth | Decline that needs diagnosis rather than another repot |
| Weeks 3–4 | New baseline under stable light | Whether the new pot improved root-zone behavior |
Some leaf loss or pause may occur after disturbance, but do not dismiss ongoing decline as “repot shock.” Check moisture, drainage, temperature, light, pests and root condition. A plant diagnostic clinic or local Extension office can help when symptoms progress or the root problem is unclear.
Questions from the plant bench
Does one root through the drainage hole mean the plant is root-bound?
No. It means a root reached the hole. Inspect the full root ball and watering behavior before deciding.
How much bigger should the new pot be?
Arkansas Extension says no more than two inches larger in diameter than the old pot. Use the smallest increase that accommodates the root system, working drainage and appropriate medium.
Should I remove all the old soil?
Not routinely. Removing sound medium can damage fine roots. Remove material when disease, pests, failed structure, salt accumulation or species-specific guidance justifies it, and contain questionable material rather than spreading it through the collection.
Can I repot in winter?
Yes when waiting is riskier because of failed drainage, unsafe containment or a root problem. For a stable plant in low light, postponing elective work until active growth may simplify recovery and aftercare.
Should I fertilize immediately?
Not automatically. Read the potting-medium label for included fertilizer and follow plant-specific guidance. More fertilizer does not repair root injury or poor drainage.
Sources and method
- Arkansas Cooperative Extension Service: How to Repot Your Houseplant — container diameter, drainage, encircling roots, planting depth and watering.
- Iowa State University Extension: Diagnosing Houseplant Problems Related to Poor Culture — overlapping symptoms involving water, light, temperature and roots.
- Iowa State University Extension: Care of Plants Growing in Containers — container watering and cultural care.
- University of Illinois Extension: Soil for Container Gardens — media aeration, drainage and water retention.
- University of Illinois Extension: Container Drainage Options — drainage holes and why coarse bottom layers do not improve drainage.
Sources were reviewed October 30, 2026. Public discussions were used to identify recurring uncertainty about one visible root, winter timing, pot-size jumps and root cutting. Recommendations were checked against Extension sources and kept species-dependent where practices differ.